Docker Tutorial
Table of Contents:
- What is Docker?
- Docker in the Script Task
- Specifying Source Files
- Outputs
- Preserving
stdoutandstderr - Providing Credentials
- Task Failures
- Registries
- Example Jobs
What is Docker?
A Docker container is a standard unit of software that packages up code and all its dependencies so the application runs quickly and reliably while being portable between computing environments. A Docker container image is a lightweight, standalone, executable package of software that includes everything needed to run an application: code, runtime, system tools, system libraries and settings. Read more about Docker containers and how they work here.
In Hybrik, you have the ability to run a Docker container as a task inside of your job utilizing inputs and outputs from other Hybrik tasks. Leveraging the automation of Hybrik with your own Docker container gives you a powerful way to create custom tasks. You can utilize public containers built by others, or build your own custom container with the tools and logic you need. Learn more about building your own Docker container.
In the following examples, you will see references to Hybrik Definitions indicated by double curly braces like {{placeholder}}. If you are not familiar, you may wish read our Definitions and Placeholders Tutorial.
Docker in the Script Task
Here is what Docker looks like inside of Hybrik using a Docker image from Dockerhub. This public Docker image is created with FFMPEG and its dependencies packaged together. In this job, we will pass in our source file from a source task. We will then utilize our Dockerized FFMPEG to create an output mp4. The resulting file will be copied to the target that we specify inside of our Docker task. By using "include_in_result": true, the next task in our Hybrik job could utilize the output from this task.
We are using an FFMPEG command line as this an FFMPEG Docker container; the command and arguments will be specific to the Docker container you specify. The first argument in the args array is the binary to execute (this is optional if you have specified an ENTRYPOINT and the args array is the array of command line arguments to pass to that binary.
Note: Even if you are not passing any arguments and have specified an ENTRYPOINT in your Dockerfile, the args array must exist with an empty string.
{
    "uid": "script_task",
    "kind": "script",
    "payload": {
        "kind": "docker",
        "payload": {
            "targets": [
                {
                    "placeholder": "output1",
                    "location": {
                        "storage_provider": "s3",
                        "path": "s3://path/to/output_folder"
                    },
                    "file_pattern": "output1.mp4",
                    "include_in_result": true,
                    "size_hint": "{source_size}"
                }
            ],
            "commands": [
                {
                    "docker_image": {
                        "image_urn": "jrottenberg/ffmpeg:centos",
                        "registry": {
                            "kind": "dockerhub",
                            "access": {
                                "username": "{{dockerhub_user}}",
                                "password": "{{dockerhub_password}}"
                            }
                        }
                    },
                    "args": [
                        "-y",
                        "-i",
                        "{source_0_0}",
                        "-f",
                        "mp4",
                        "{output1}"
                    ]
                }
            ]
        }
    }
}
Specifying Source files
Source task
By default, the the Docker task receives files from the preceding task as input, often the job’s source task. If the previous task specifies a single source asset (and not a complex asset or multiple files), the source specifier will always be {source_0_0}.
You can see in the example above how to access a source from a complex asset or different task using the placeholder {source_0_0} which follows this format: {source_V_C}.
source_should be verbatim, a source from the list of inputsVis anasset_versionnumber (zero-indexed) from a complex assetCis theasset_componentnumber, used if a source has multiple assets in theasset_version(zero-indexed)
Explicitly Specifying Inputs
You can pass one or more inputs directly into a Docker Script task, rather than from a source task. Your Hybrik Job still needs to begin with a source task, but with the example below, you could pass in any file and it would be ignored.
{
    "uid": "script_task",
    "kind": "script",
    "task": {
        "retry_method": "fail"
    },
    "payload": {
        "kind": "docker",
        "payload": {
            "sources": [
                {
                    "asset_url": {
                        "storage_provider": "s3",
                        "url": "{{source_path}}/{{file0}}"
                    },
                    "placeholder": "explicit_file0"
                },
                {
                    "asset_url": {
                        "storage_provider": "s3",
                        "url": "{{source_path}}/{{file1}}"
                    },
                    "placeholder": "explicit_file1"
                }
            ],
            "targets": [
                {
                    "placeholder": "output_file",
                    "location": {
                        "storage_provider": "s3",
                        "path": "{{destination_path}}"
                    },
                    "file_pattern": "output_image.jpg",
                    "include_in_result": true
                }
            ],
            "commands": [
                {
                    ...
                    "args": ["ffmpeg", "-i", "{explicit_file0}", "-i", "{explicit_file1}", ... "{output_file}"]
Sequence of Inputs
You may have multiple source files that you need to provide to your Docker task. For example, you may have a sequence of images or a number of audio files that your Docker task merges. You can specify a wildcard for inputs that might be numbered sequentially. This works for a handful or hundreds of source files, but we don’t recommend this for thousands of sources. You can then specify your source folder as a placeholder in your task.
Beware that "files_per_job": 50 will run 1 job for the first 50 files. The second group 50 files will run in a second job. This sample job will convert a folder of jpeg images to png images.
"payload": {
    "elements": [
        {
            "uid": "sources",
            "kind": "folder_enum",
            "task": {
                "retry_method": "retry",
                "retry": {
                    "count": 1,
                    "delay_sec": 30
                }
            },
            "payload": {
                "source": {
                    "storage_provider": "s3",
                    "path": "{{source_path}}",
                    "access": {
                        "max_cross_region_mb": 10
                    }
                },
                "settings": {
                    "pattern_matching": "wildcard",
                    "wildcard": "IMG_00*",
                    "recursive": true,
                    "files_per_job": 60
                }
            }
        },
        {
            "uid": "script_task",
            "kind": "script",
            "payload": {
                "kind": "docker",
                "payload": {
                    "sources": [
                        {
                            "source_reference": "sources",
                            "placeholder": "input_folder"
                        }
                    ],
                    "commands": [
                        {
                            "docker_image": {
                                ...
                            },
                            "args": [
                                "ffmpeg",
                                "-i",
                                "{input_folder}/image_%4d.jpg",
                                "-f",
                                "image2",
                                "{output_folder}/out_%4d.png"
                            ]
                        },
Outputs
Single File Outputs
Your Docker task might have a file output. You can tell Hybrik where you want to store it by specifying an output path with a placeholder, and referring to the placeholder in the args.
"targets": [
    {
        "placeholder": "output_file",
        "recursive": true,
        "location": {
            "storage_provider": "s3",
            "path": "s3://path/to/output"
            ...
        },
        "file_pattern": "my_result_image.jpg"
    }
],
"commands": [
    {
        "docker_image": {
            ...
        },
        "args": ["ffmpeg", "-i", "{explicit_file0}", "-i", "{explicit_file1}", ... "{output_file}"]
    },
Recursive Output
You might have a Docker container that creates multiple files, directories, or uses nested directories. You can recursively copy all of your output files to cloud storage by specifying "recursive": true inside of a target.
"targets": [
    {
        "placeholder": "output_folder",
        "recursive": true,
        "location": {
            "storage_provider": "s3",
            "path": "s3://path/to/output"
            ...
        }
    }
],
Preserving stdout and stderr
It can be helpful to get the stdout or stderr from a Docker task, especially if the task fails. You can explicitly tell Hybrik to preserve this data by adding the following below your args array. The results will appear in the Job Summary for the Docker script task.
"commands": [
    {
        "docker_image": {
            ...
        },
        "args": ["ffmpeg", "-i", "{explicit_file0}", "-i", "{explicit_file1}", ... "{output_file}"],
        "preserve_stdout": true,
        "preserve_stderr": true
    },
Example in Job Results
Here is what the results look like inside of the task results json:
"documents": [
    {
        "result_payload": {
            "kind": "error",
            "payload": {
                "code": -1,
                "message": "script failed",
                "stderr": "My error message appears in stderr here.",
                "stdout": "",
Environment Variables
There may be cases where you need to pass in environment variables to your Docker image at runtime. For example, you might do this to provide credentials. Here is how you can define environment variables for your Docker image. Environment variables can also be references to a Hybrik Definition.
"env": {
   "env_var1": "content1",
   "something_else": "{{definition_placeholder}}"
   ...
},
"args": ["your_binary", "--your", "args", "here"]
Providing Credentials to your Docker
When utilizing AWS credentials, Hybrik has the ability to generate temporary STS credentials which can be provided as environment variables to the Docker. This requires a little bit of configuration
Setup AWS STS Type Credentials
First, In the Hybrik Credentials Vault, you need a credential set with the type AWS STS Credentials. You will need to input the following:
- An AWS IAM user Secret
- An AWS IAM user Key
- An IAM policy to limit the rights of the temporary credentials that Hybrik will generate based on the AWS IAM User that will generate the STS credentials
Here is an example AWS IAM policy to generate credentials with access to s3 storage.
NOTE: You are limited on the number of characters you can provide in the Hybrik interface, so we recommend minifying your policy to remove white space.
{
    "Version": "2012-10-17",
    "Statement": [
        {
            "Effect": "Allow",
            "Action": [
                "s3:ListBucket",
                "s3:PutObject",
                "s3:GetObject",
                "s3:DeleteObject"
            ],
            "Resource": [
                "arn:aws:s3:::*"
            ]
        }
    ]
}

Next, you must enable the Docker passthru in the “Advanced” section for the computing group
Grant Permission for your IAM user to Get a Token
Our IAM user will need permissions to generate STS tokens.
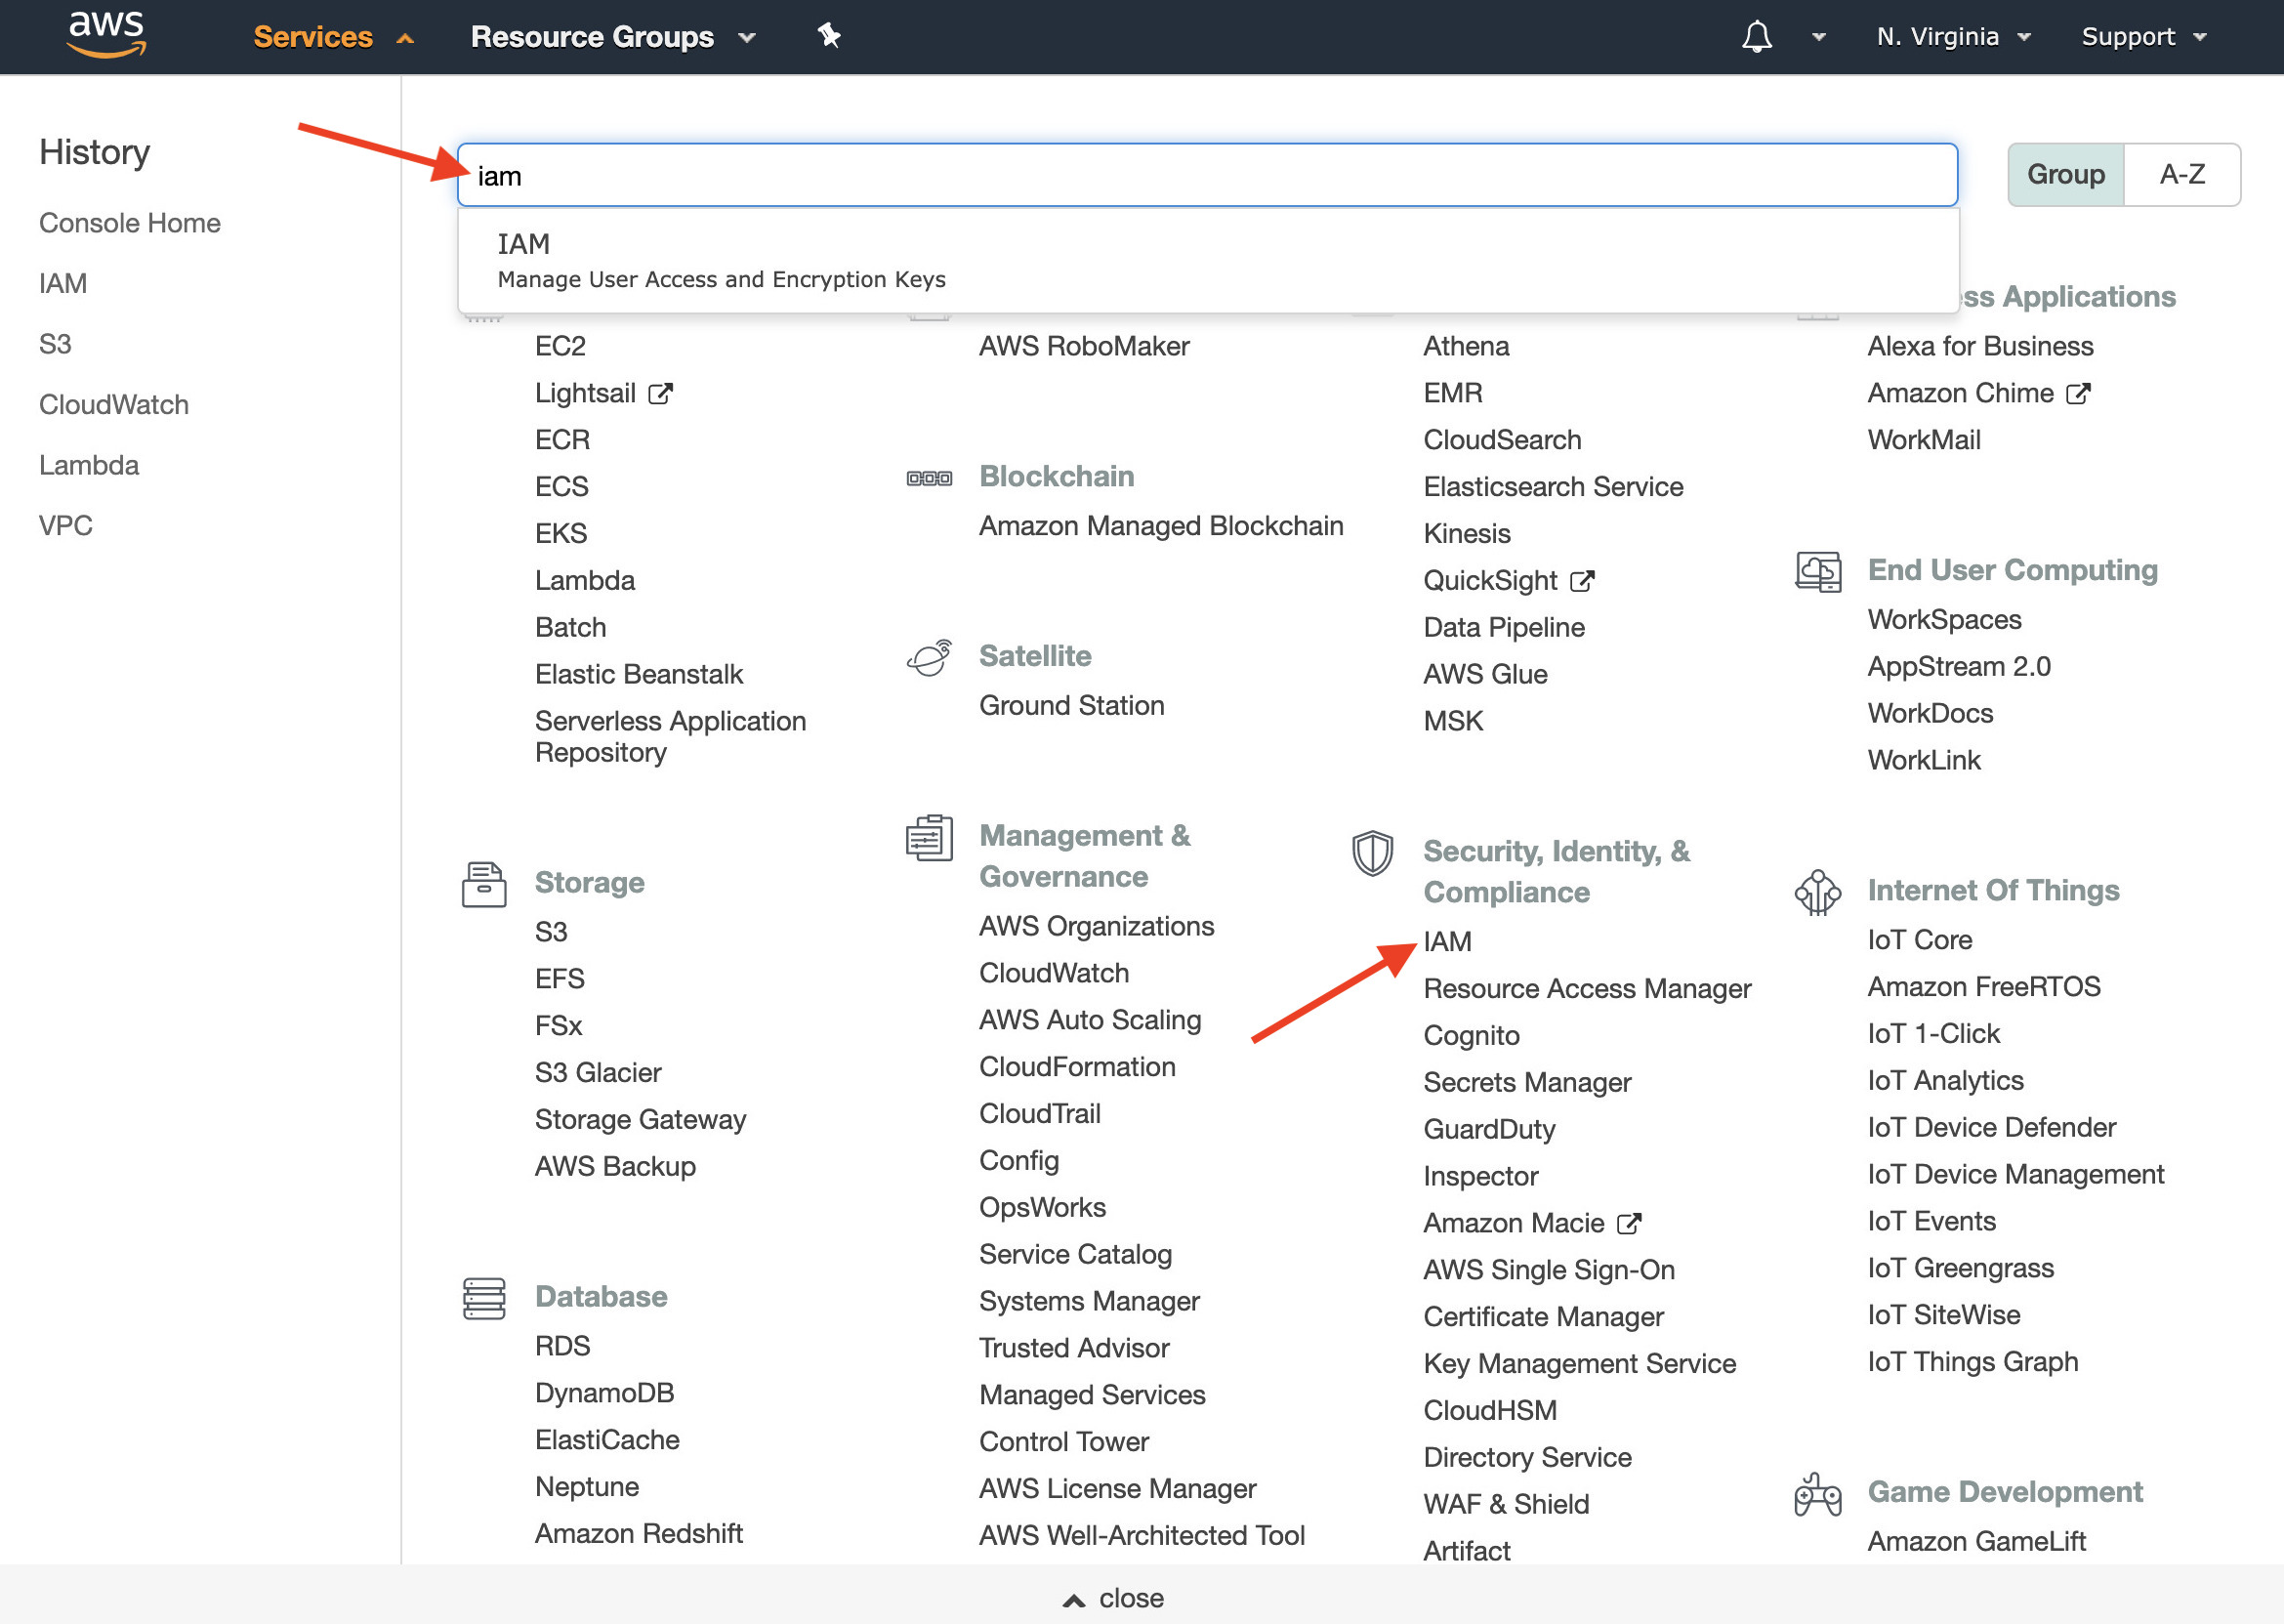
- Log into the AWS management console. Enter IAM in the search box and then click on IAM in the search results, or find IAM listed under Security, Identity, and Compliance.
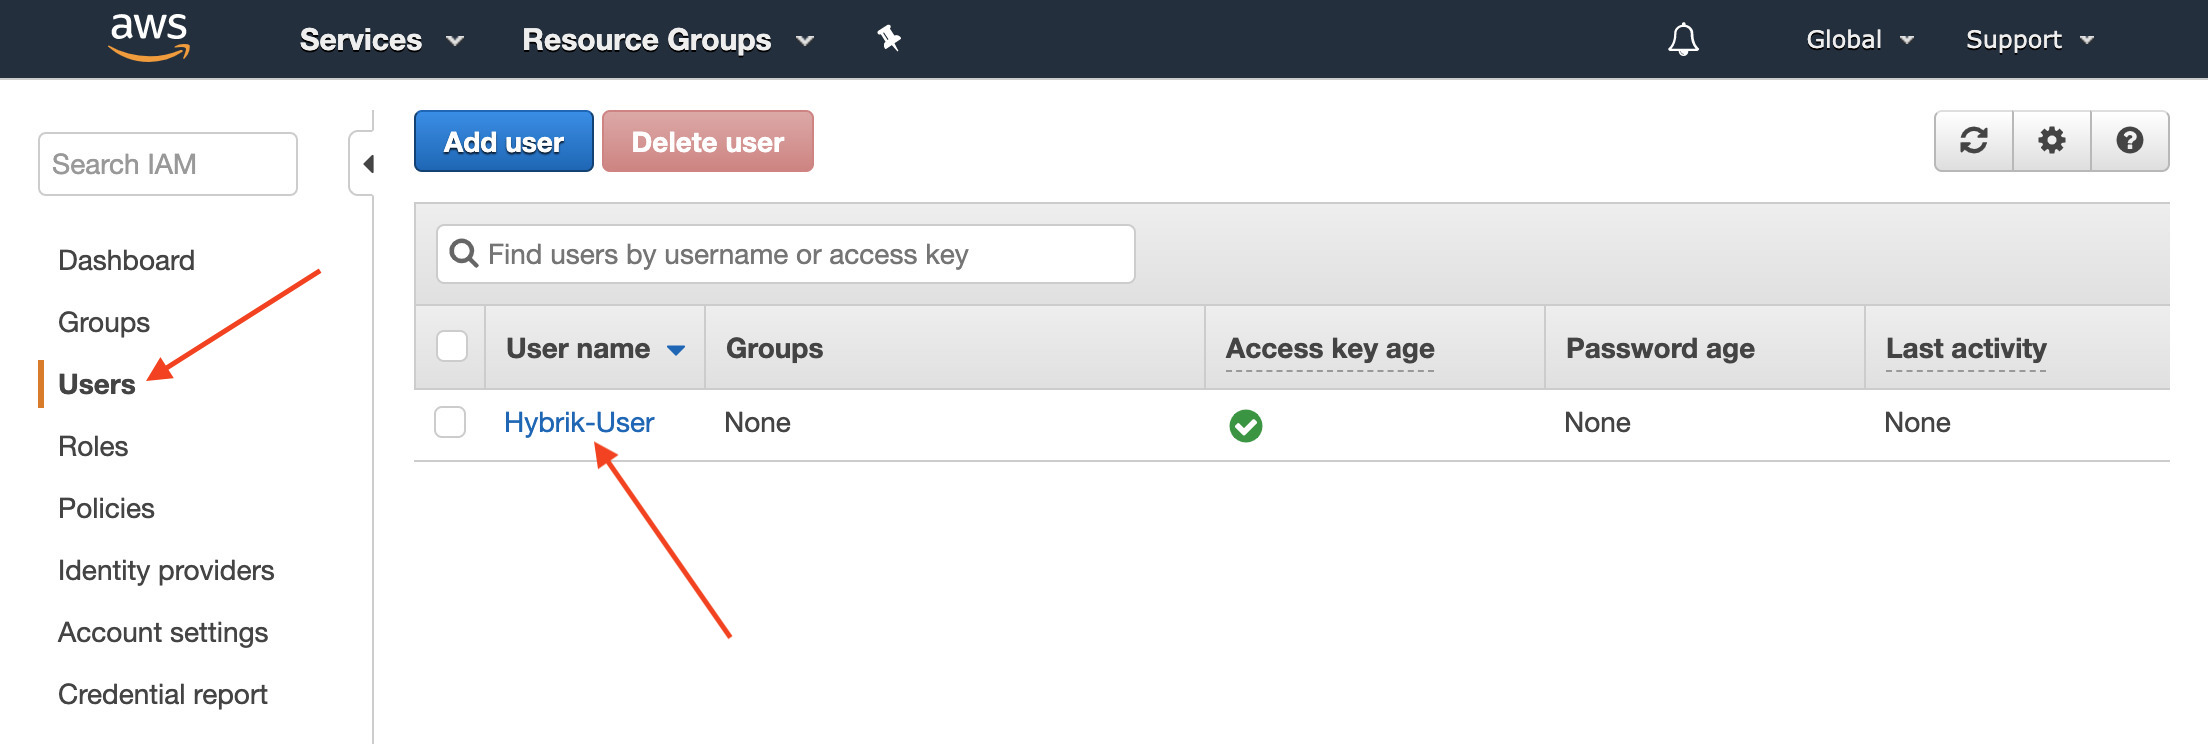
- On the left side of the IAM welcome page, click on Users. Click on the user that you use with Hybrik; this should match the user in the Credentials Vault that has access to your S3 bucket.
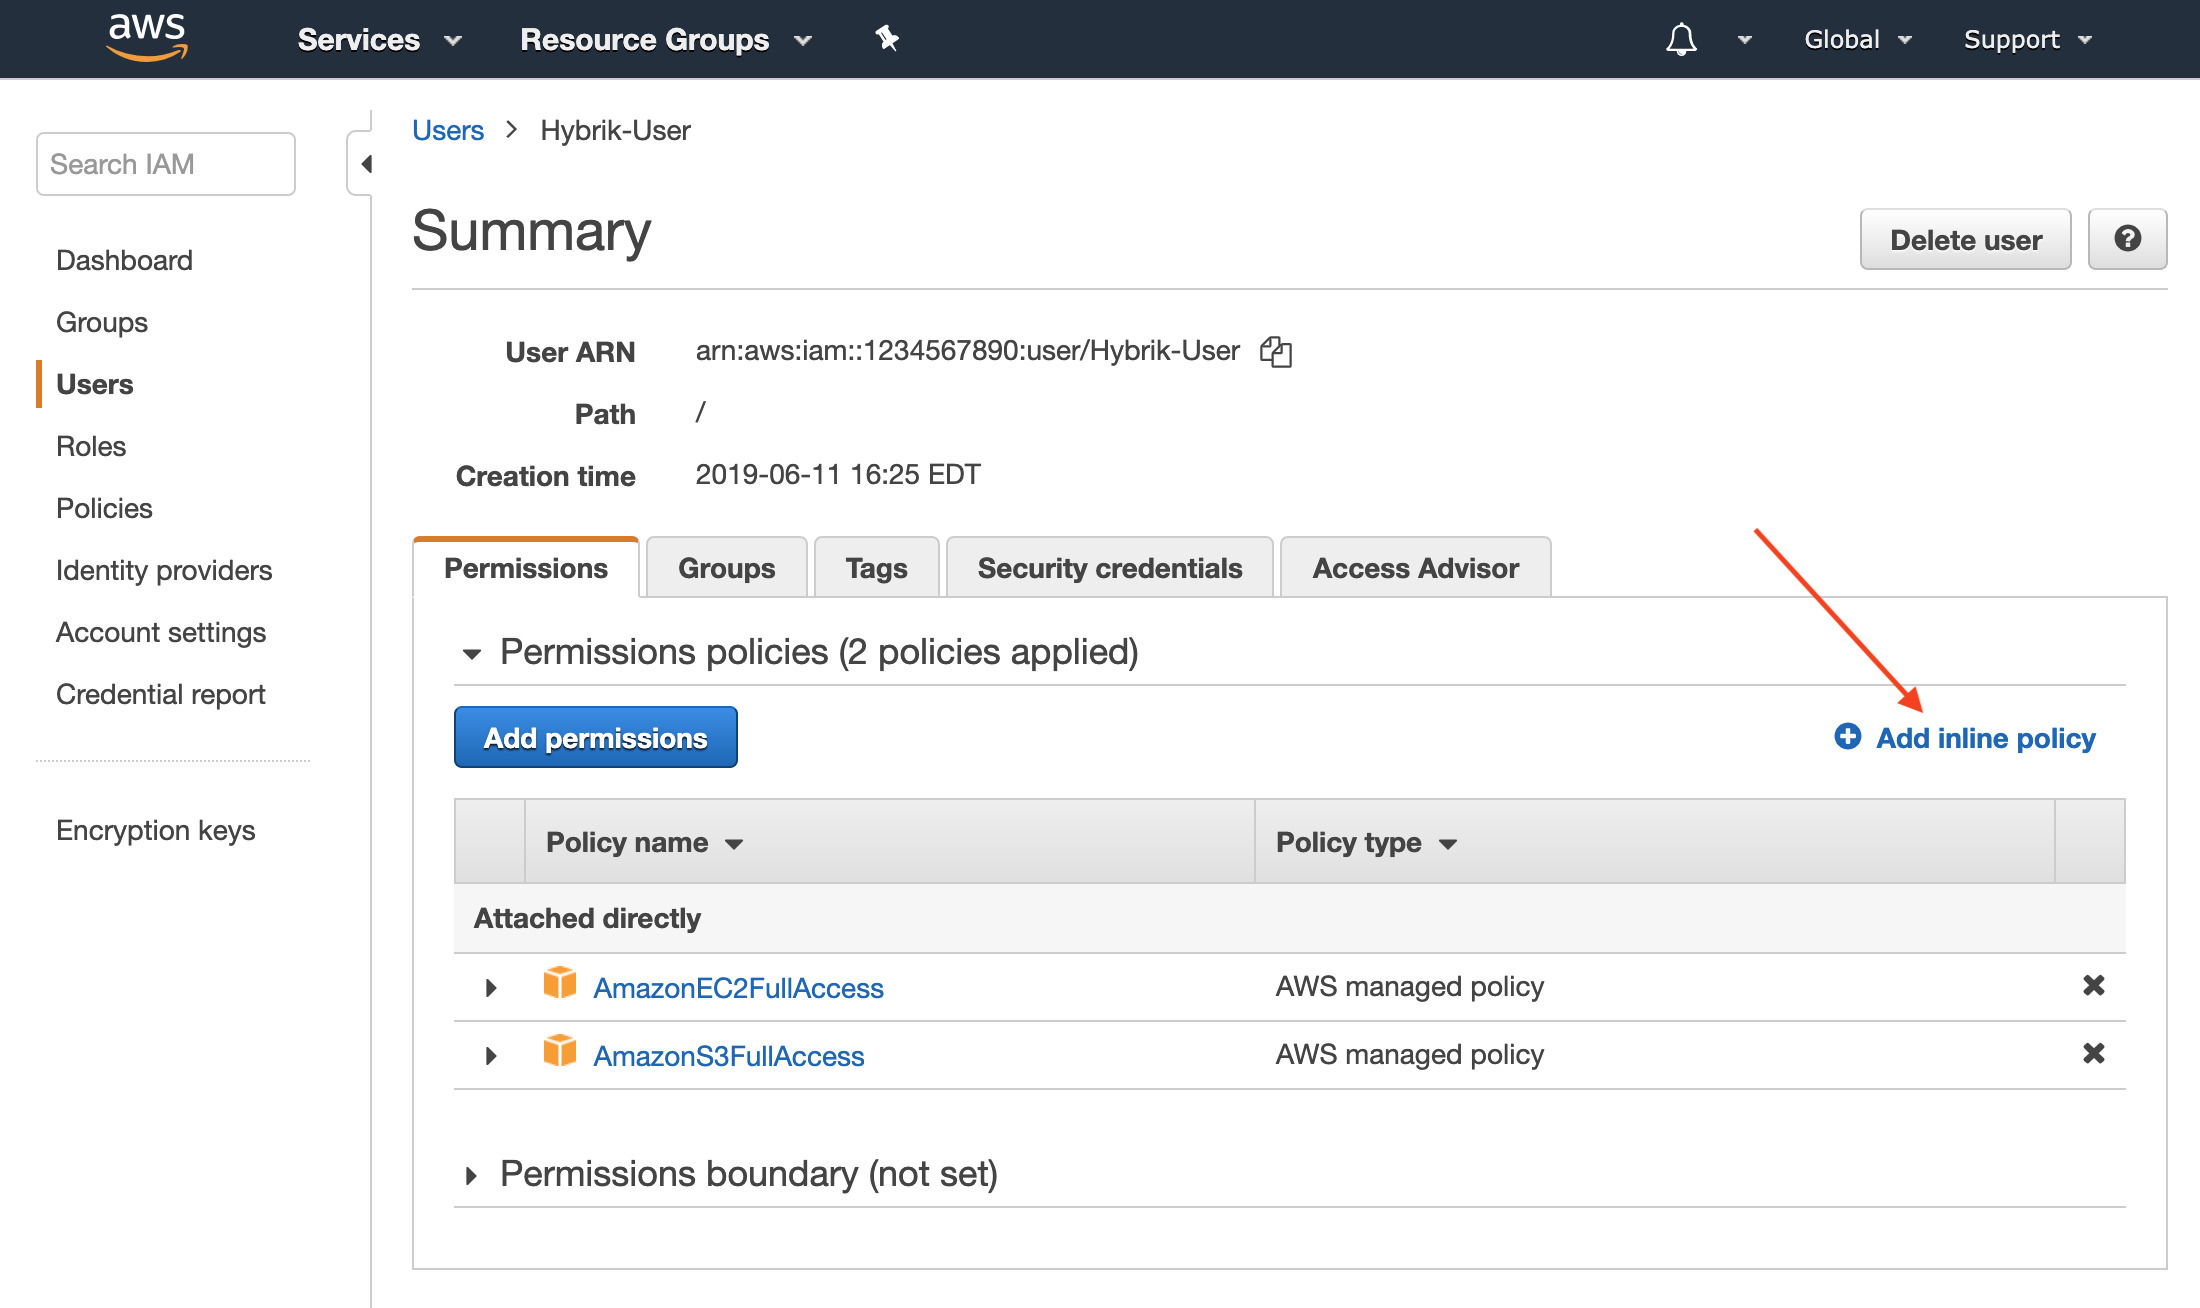
- Click Add Inline Policy.
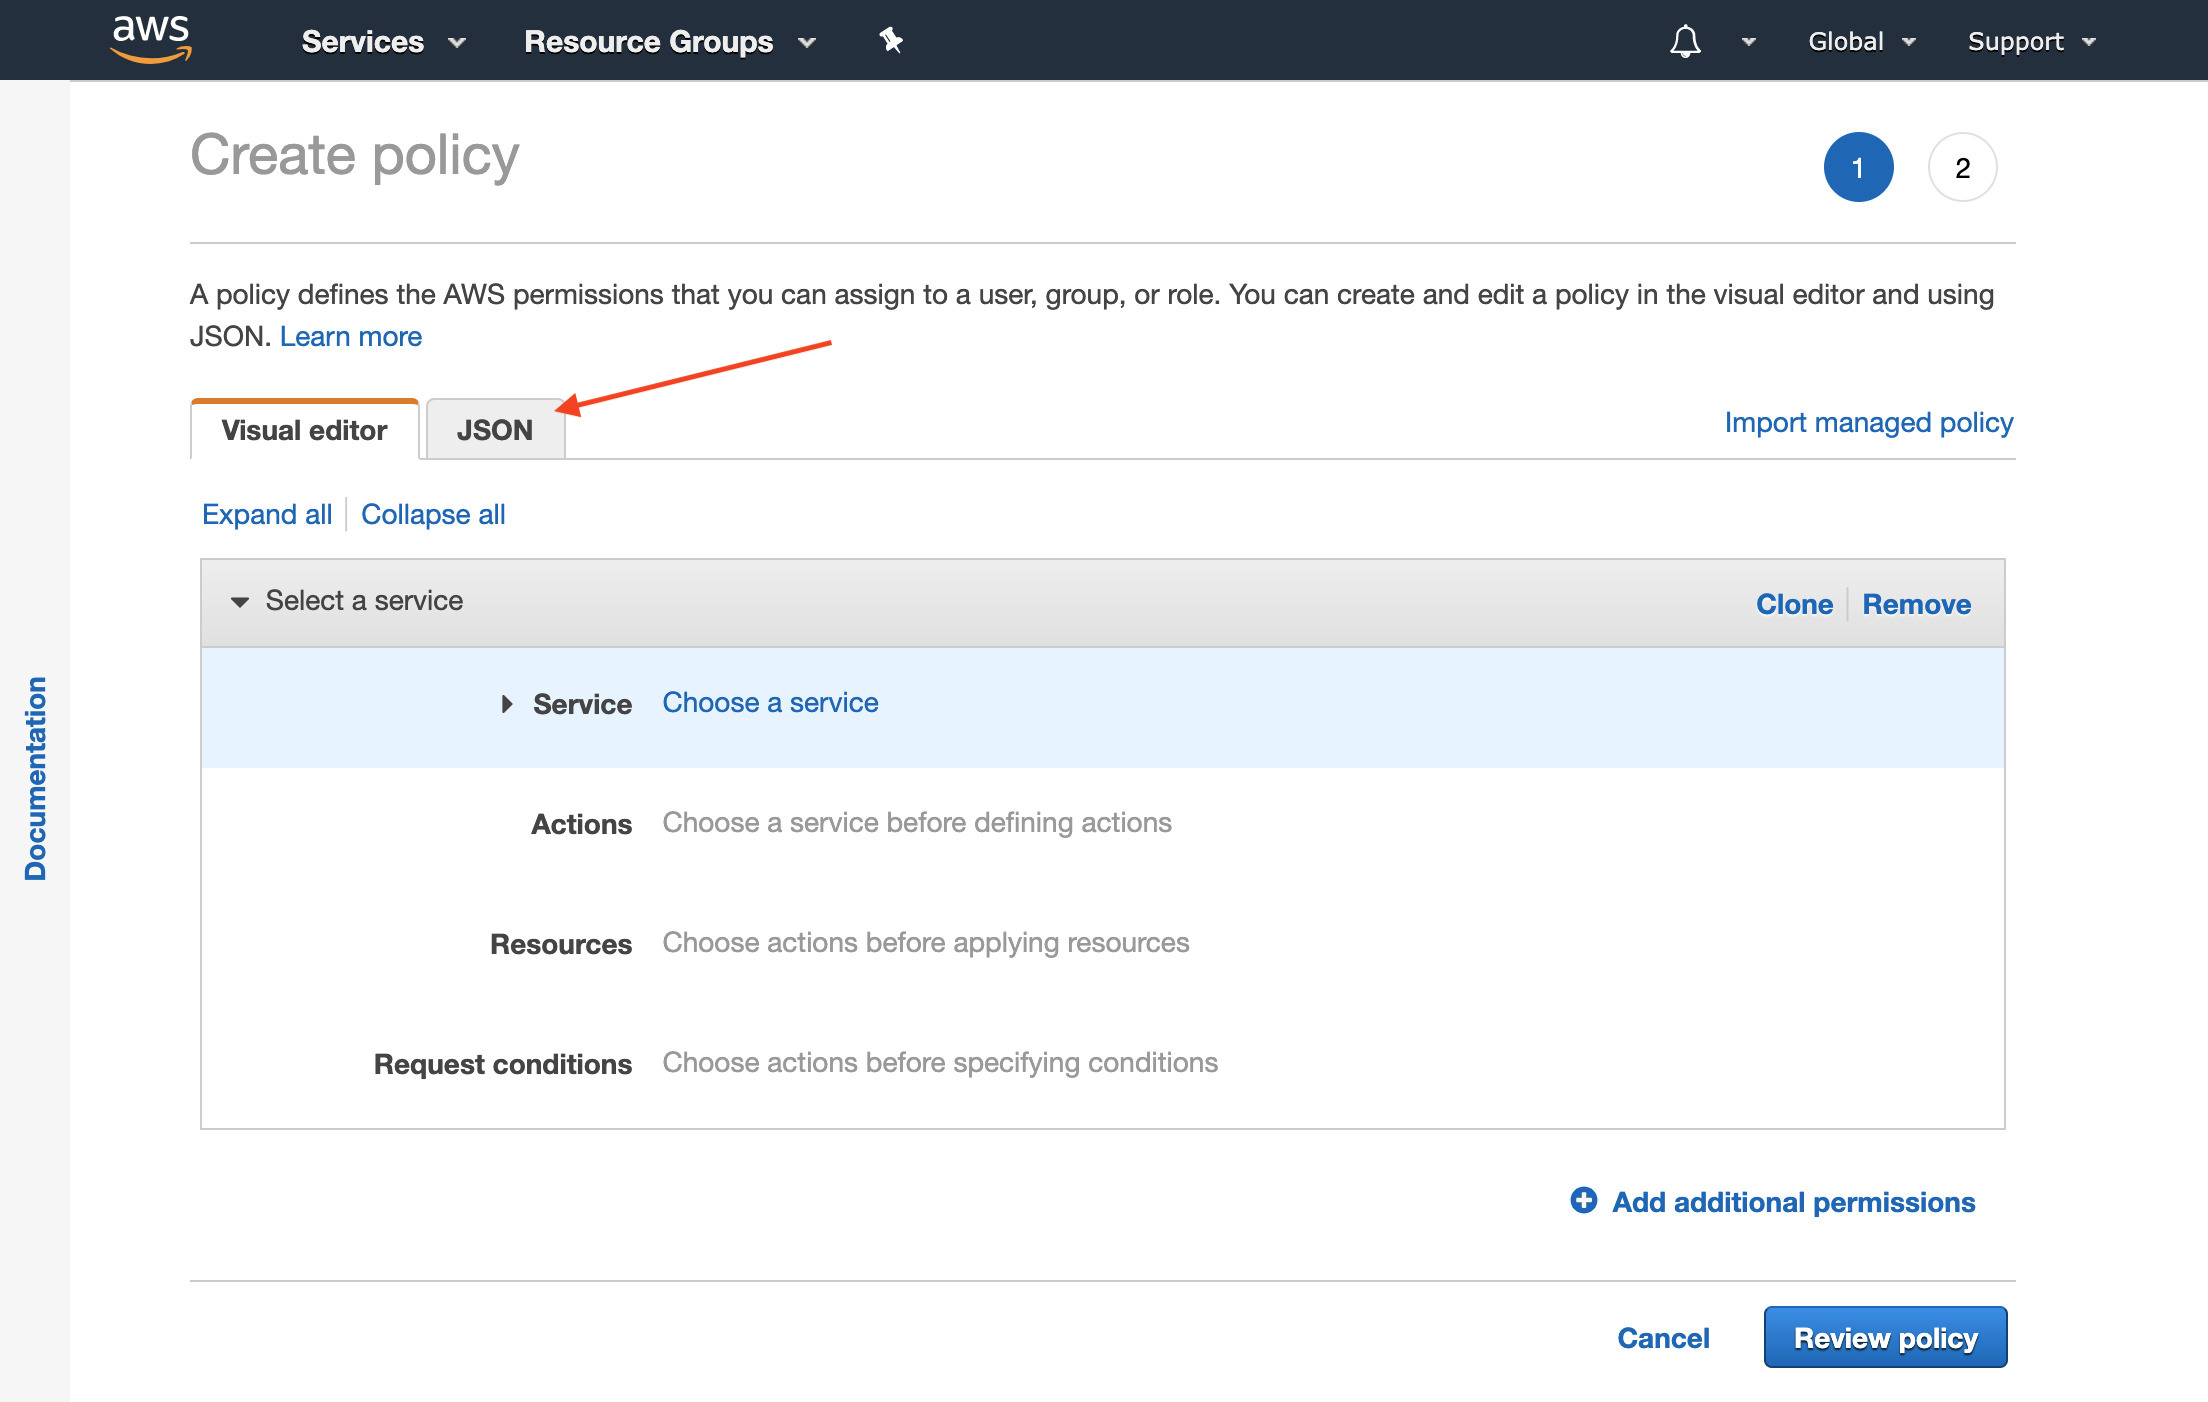
- The policy visual editor will appear, choose the tab at the top labeled JSON
- Copy and paste the following policy into the json editor.
  {
   "Version": "2012-10-17",
   "Statement": [
   {
       "Sid": "Stmt1488296745000",
       "Effect": "Allow",
       "Action": [
           "sts:GetFederationToken"
       ],
       "Resource": [
           "arn:aws:sts::YOUR_AWS_ACCOUNT_ID_GOES_HERE:federated-user/hybrik_*"
       ]
   }]
  }
Make sure to replace
YOUR_AWS_ACCOUNT_ID_GOES_HEREwith your account number which can be found by clicking on your account name in the upper right corner of the AWS console and clicking My Account.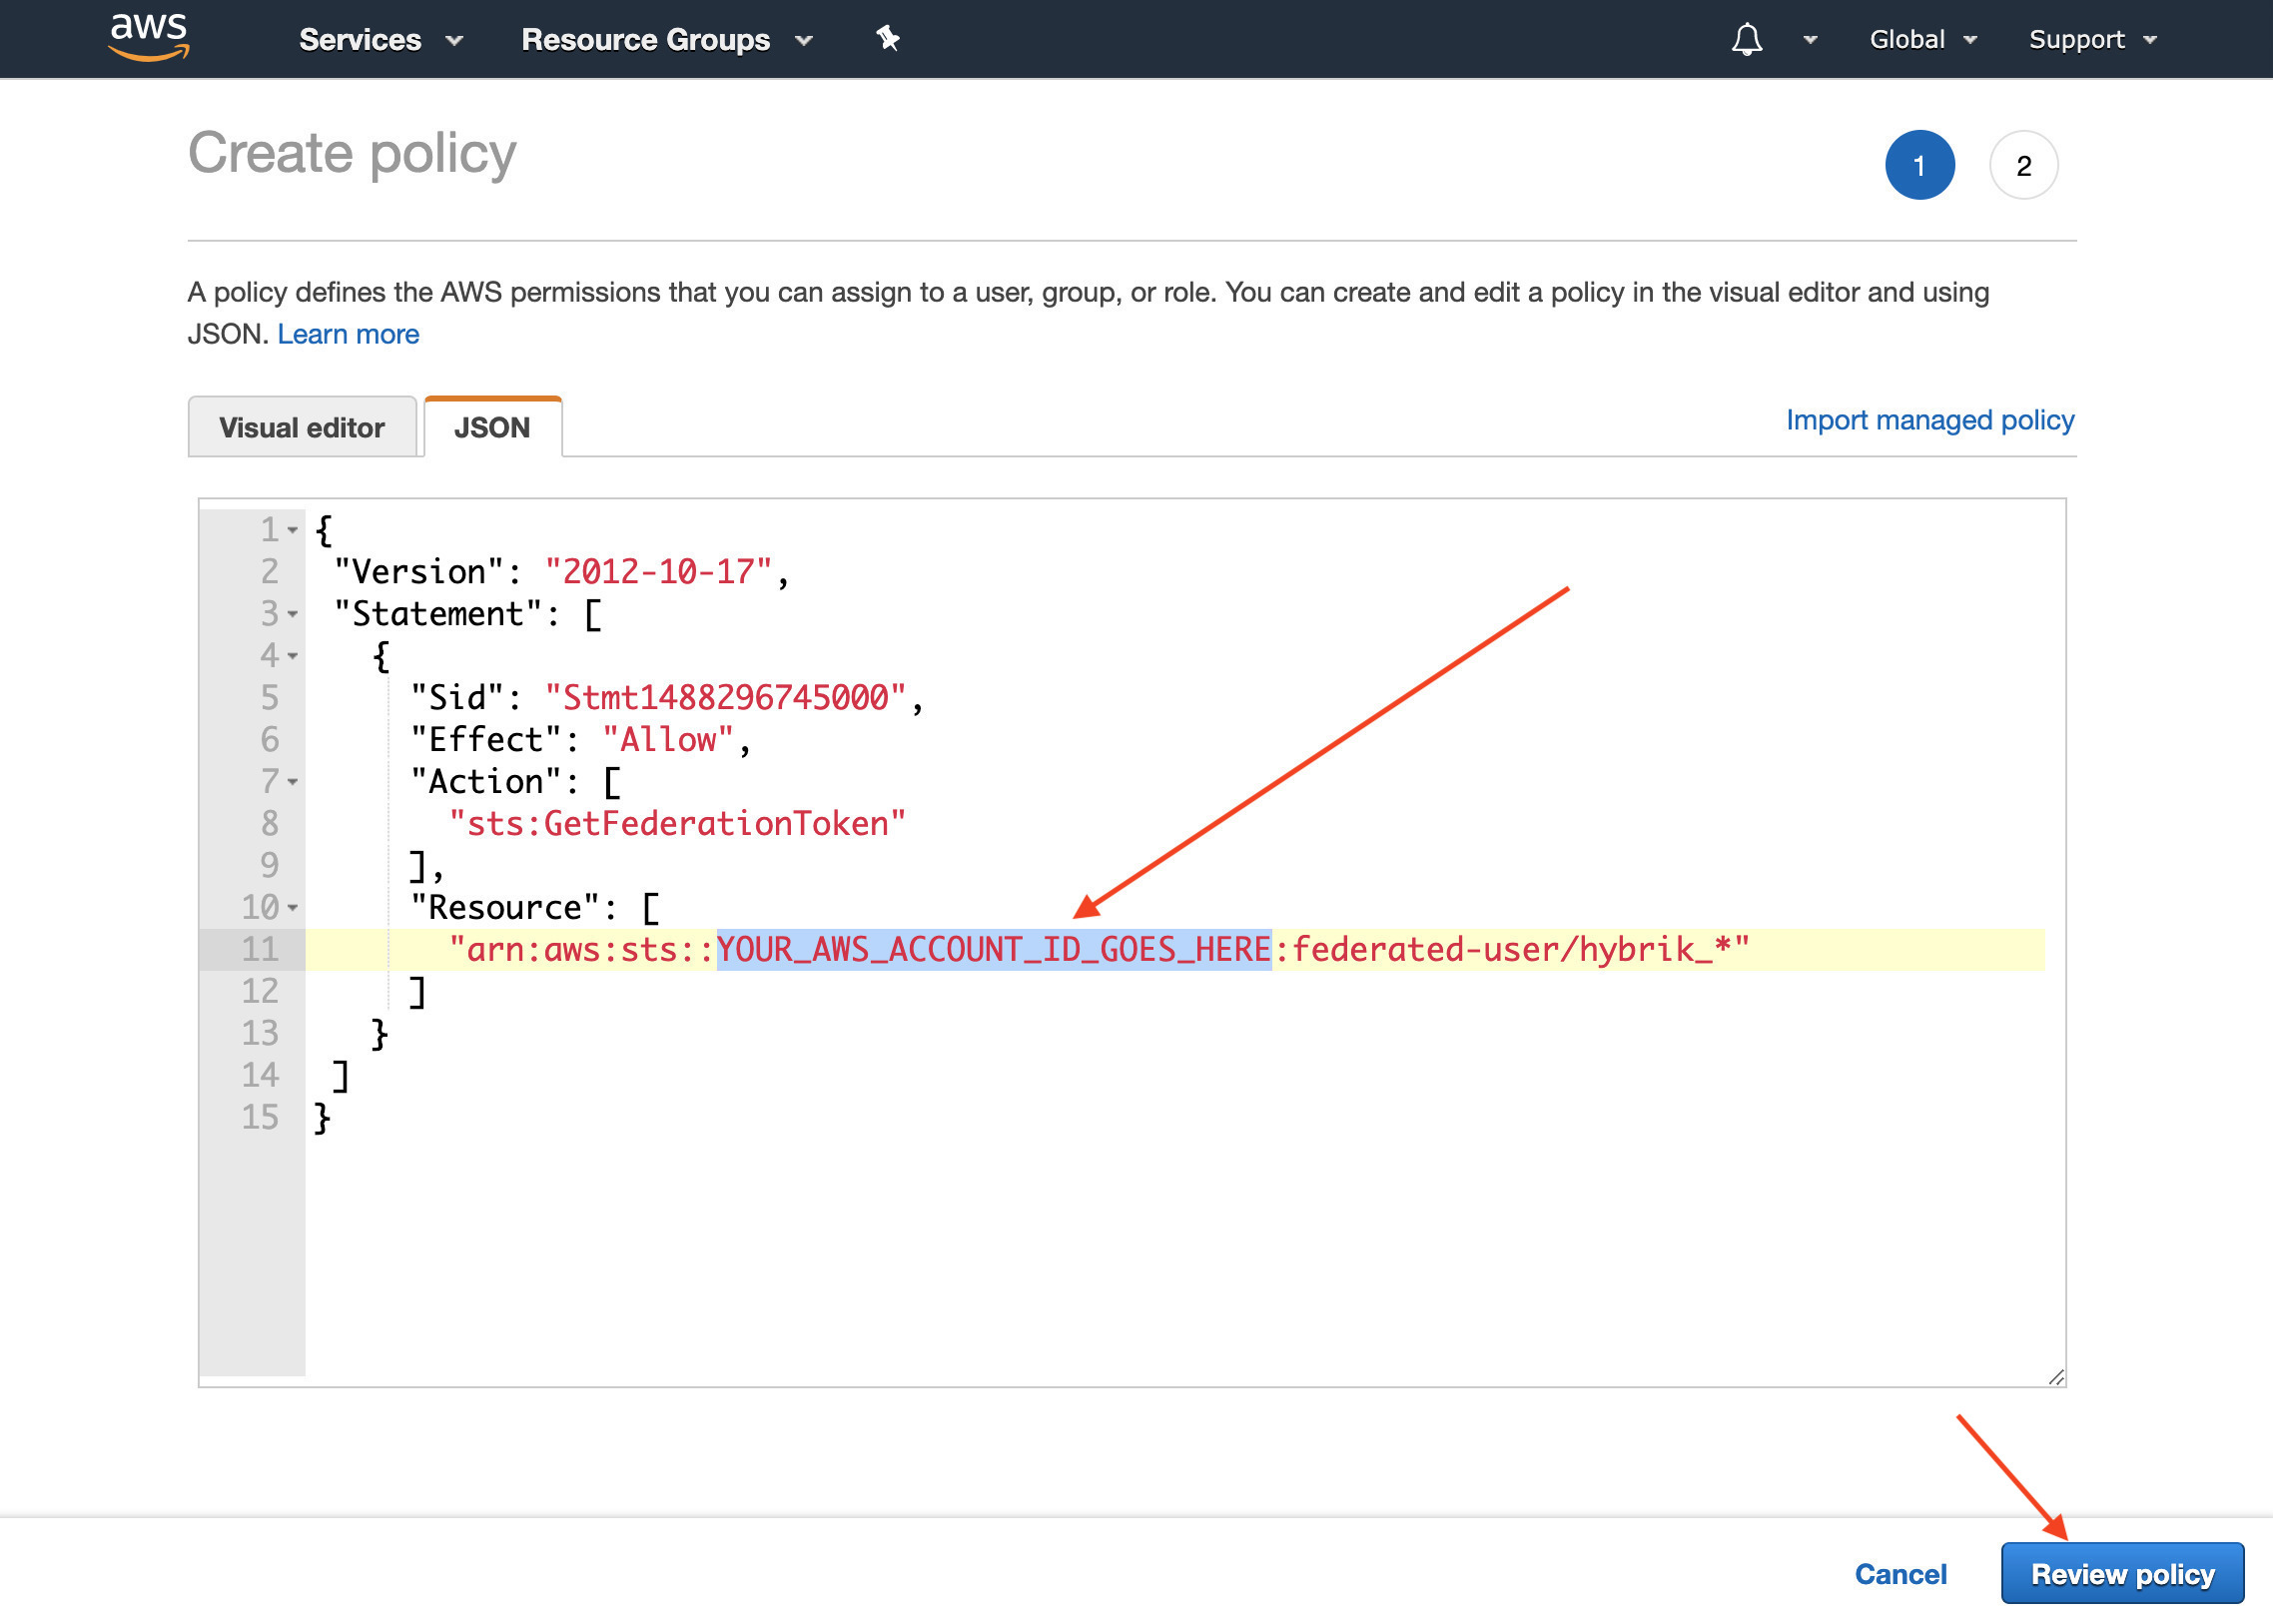 Click Review Policy
 - Add a Name to your policy such as
hybrik-player-sts, then choose Create Policy at the bottom right.
NOTE: Amazon has a bug where it will display what appears to be an error as pictured below. This is actually a warning, not an error. You should still click “Create Policy”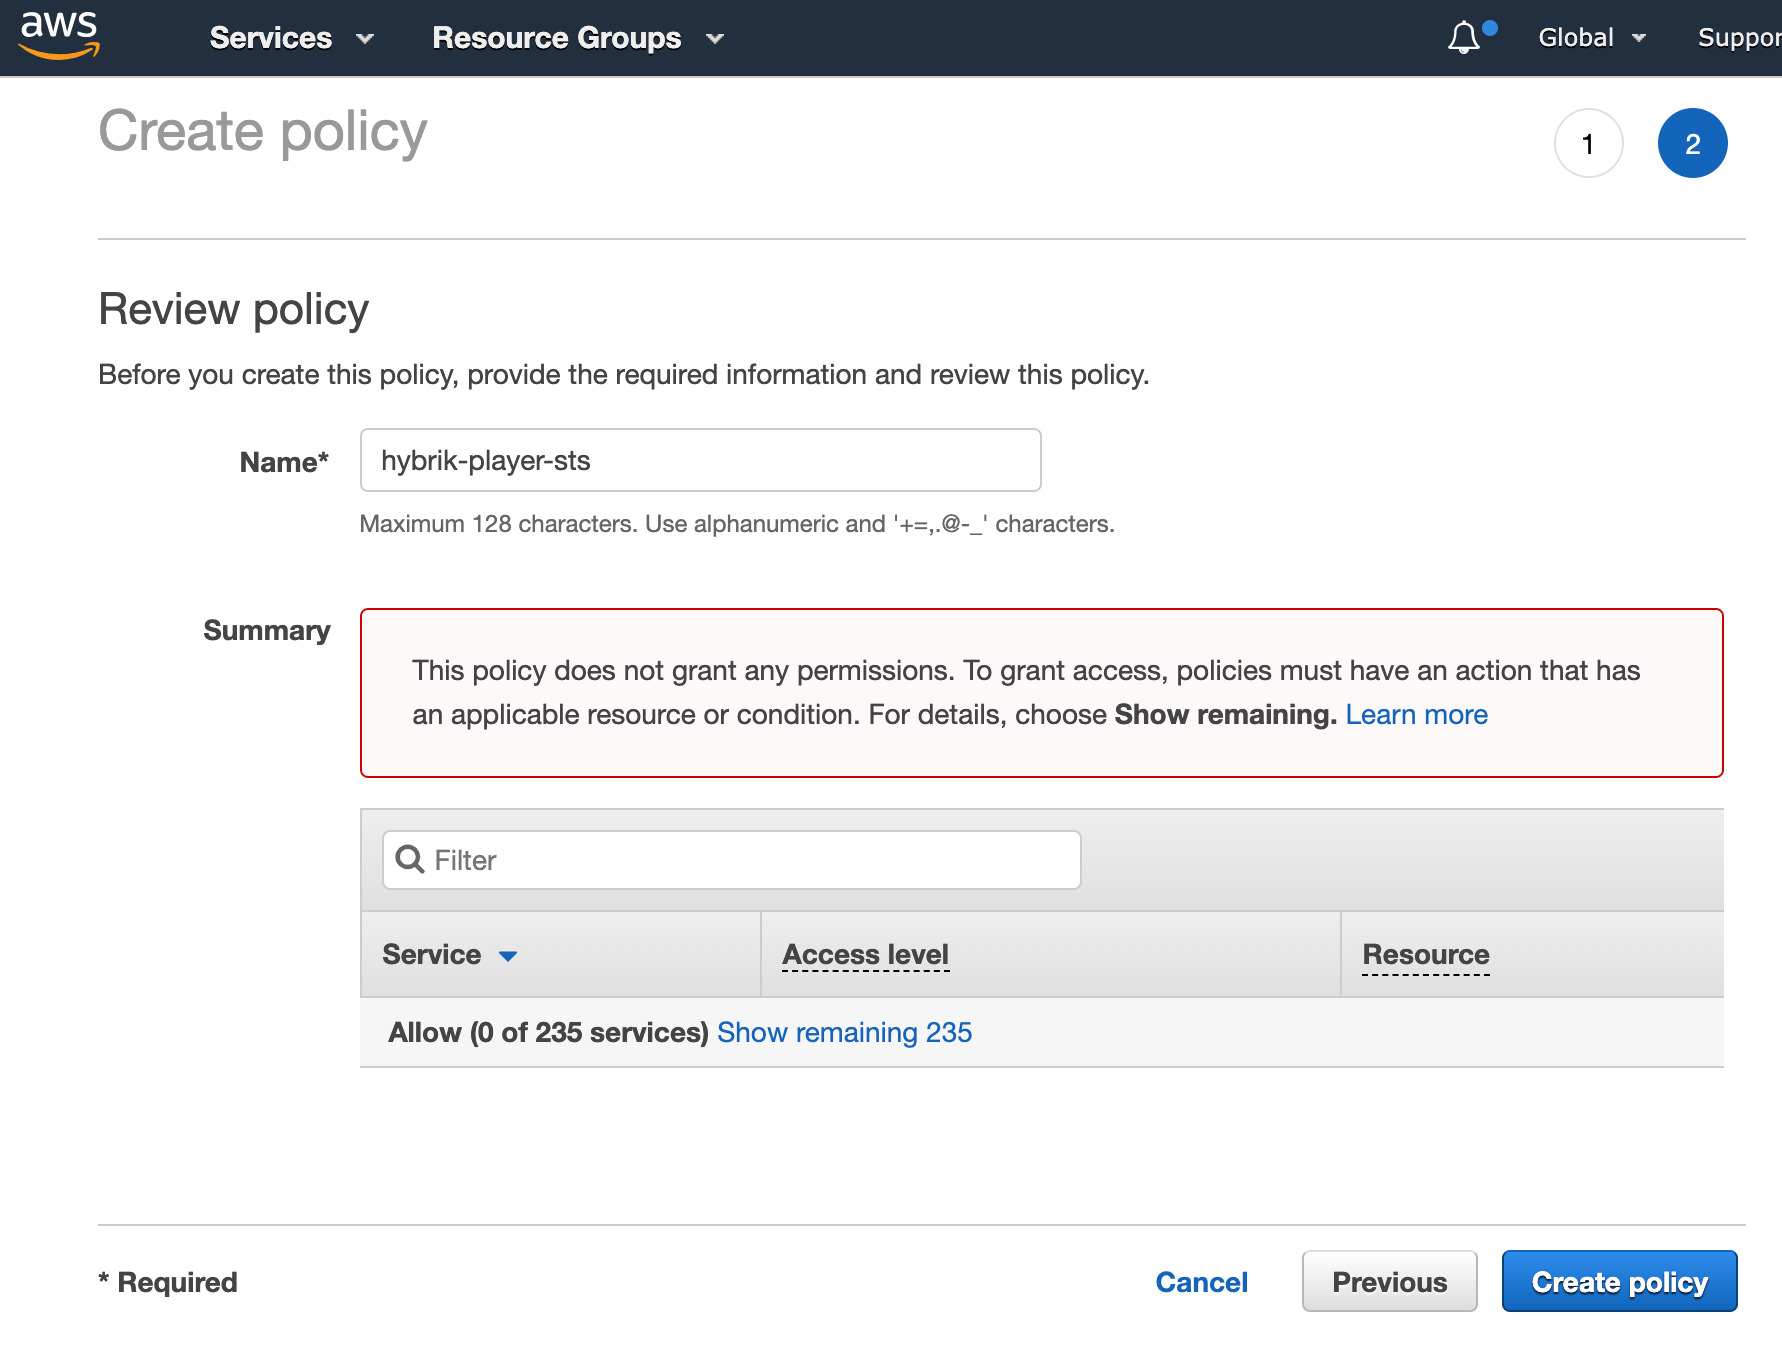
- Your STS policy is now created! You can preview it by clicking on Show More and opening the disclosure triangle
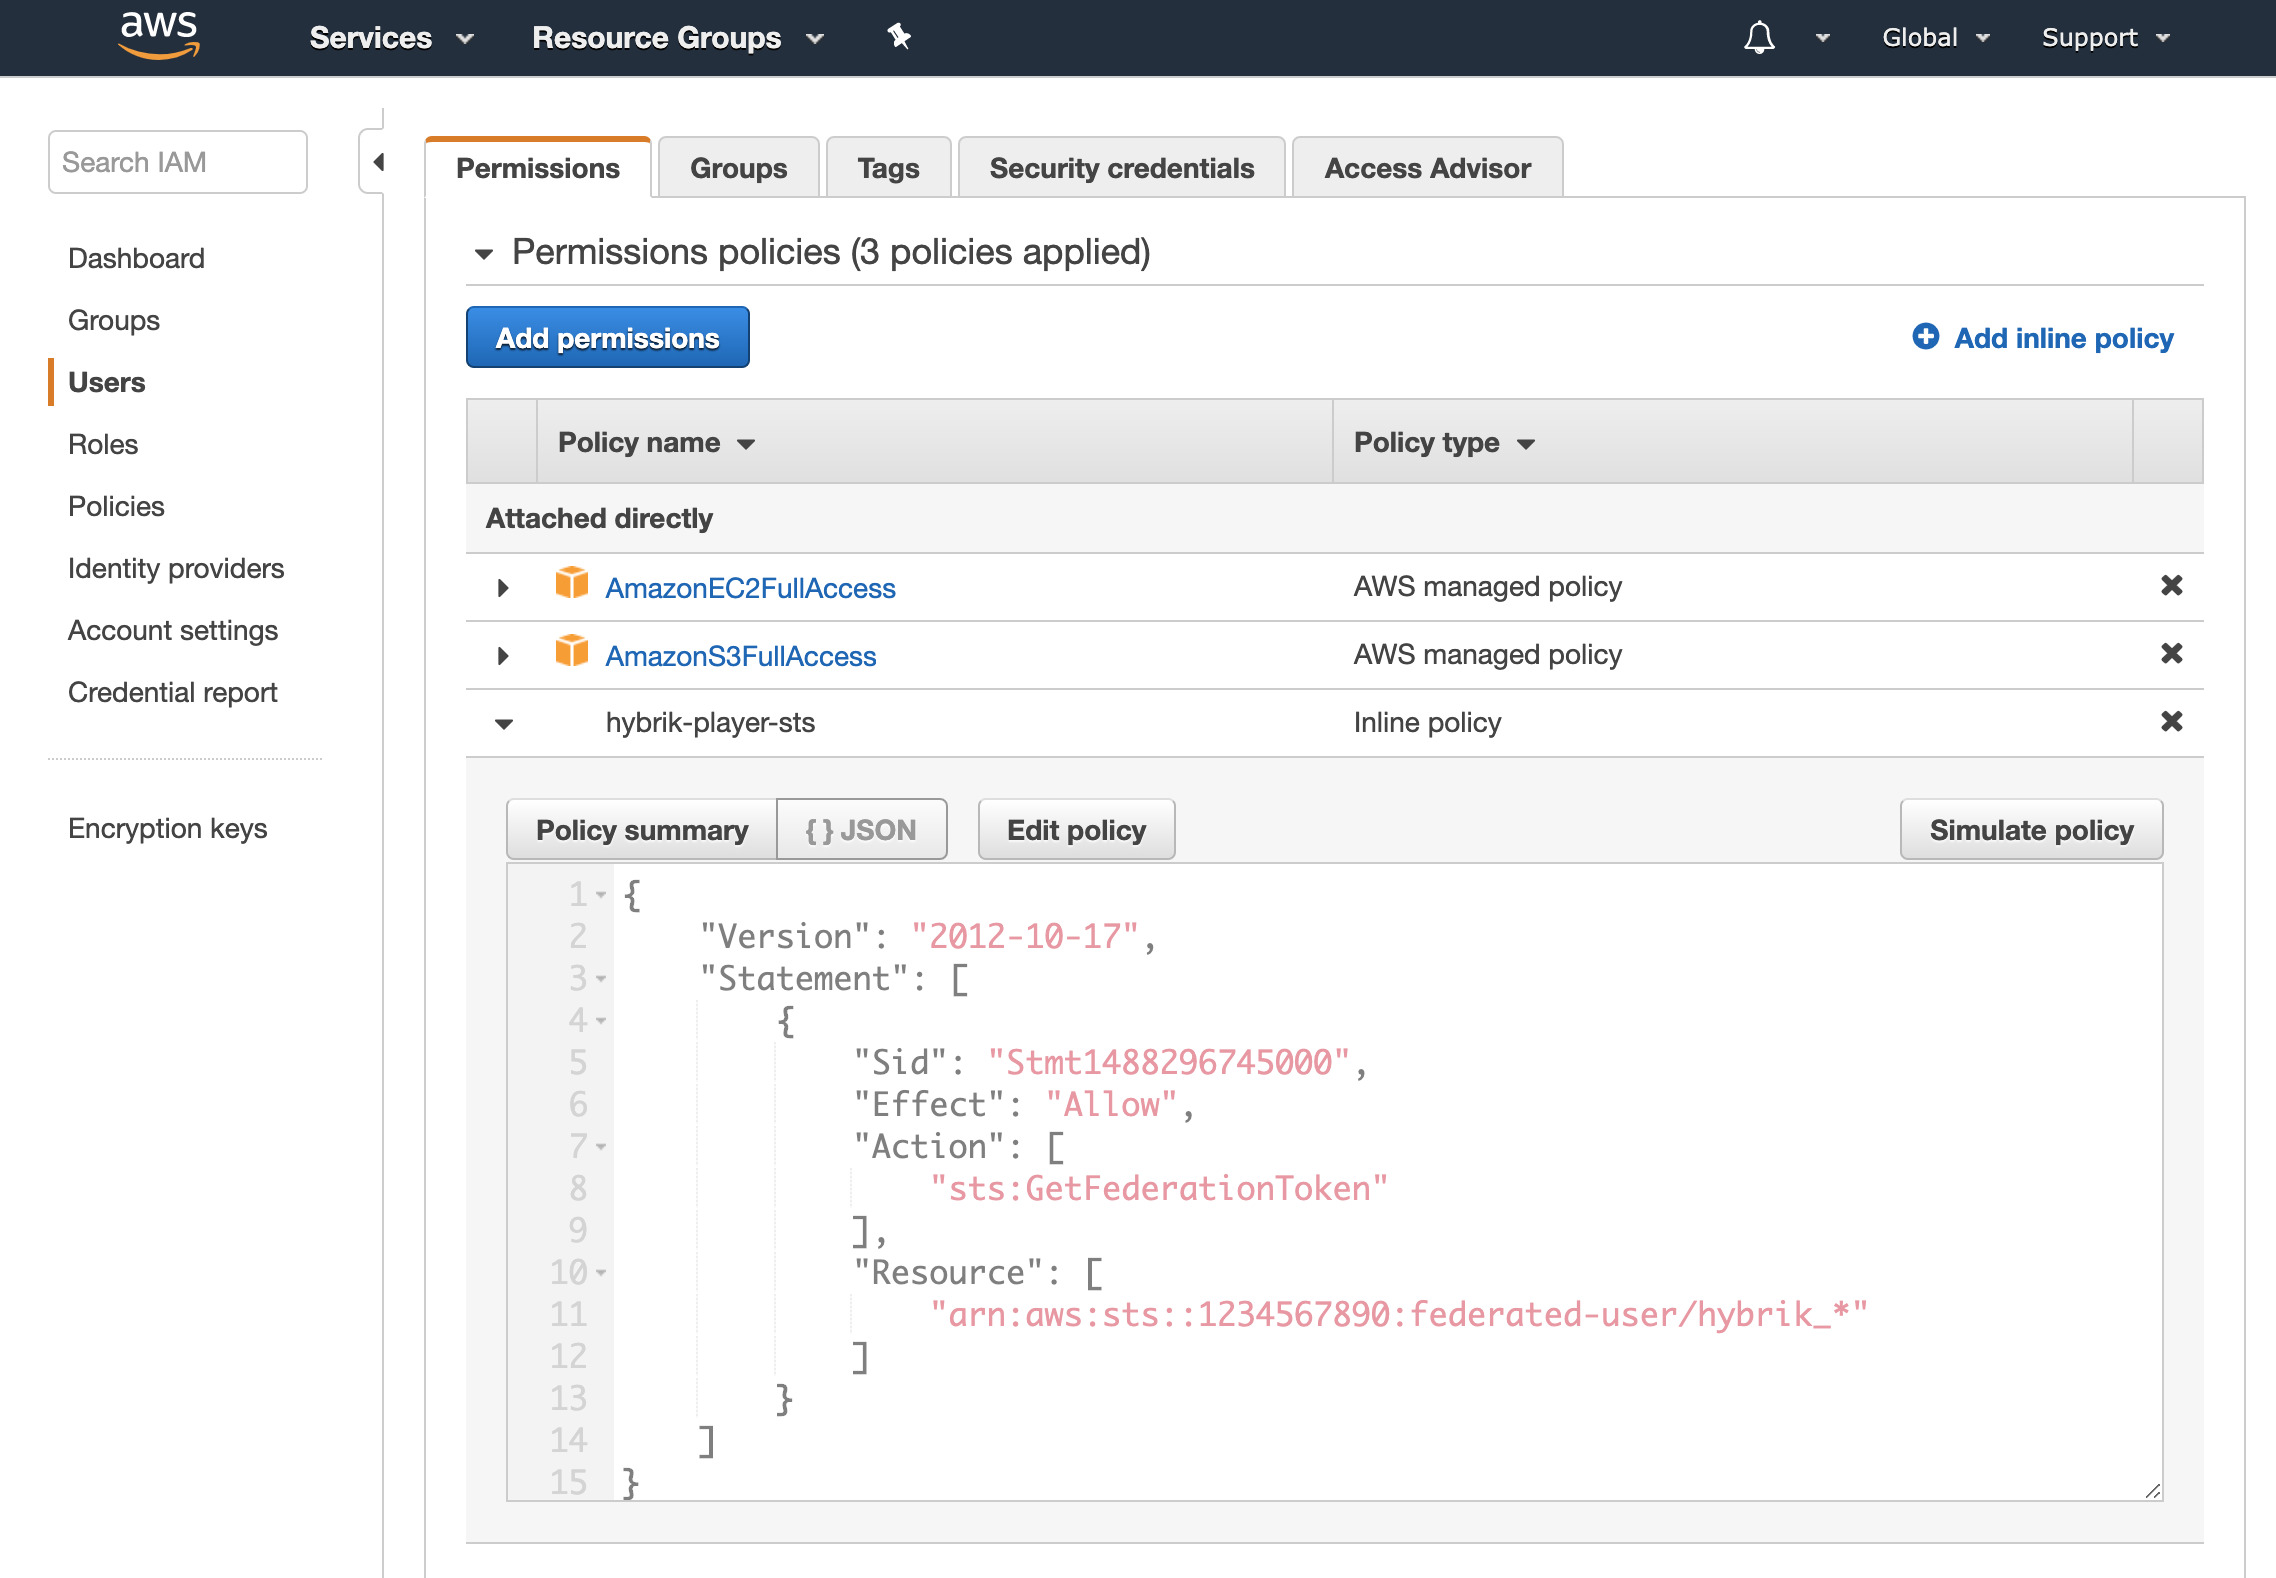
When Hybrik generates the temporary token from STS, we will always use the prefix hybrik_.
NOTE: You can alternatively add this as a standard IAM policy or to an existing IAM policy, it does not need to be an inline policy
Tell Hybrik to Use the STS Credentials in the Hybrik Job
In the commands section of your Docker script task, you need to provide a secrets section. This will configure what environment variable names are assigned inside of your Docker and how long they should be valid for.
lifespan_sec accepts an integer which specifes the time in seconds. Valid durations are between 900 minimum (15 mins) and 129600 maximum (36 hours).
{
    "uid": "docker_task",
    "kind": "script",
    "payload": {
        "kind": "docker",
        "payload": {
            "commands": [
                {
                    "secrets": [
                        {
                            "source": "hybrik_vault",
                            "kind": "aws_sts_credentials",
                            "key": "{{credentials_key}}",
                            "request_properties": {
                                "lifespan_sec": 900
                            },
                            "docker_interface": {
                                "kind": "environment_variables",
                                "variable_names": {
                                    "shared_key": "AWS_ACCESS_KEY_ID",
                                    "secret_key": "AWS_SECRET_ACCESS_KEY",
                                    "session_token": "AWS_SESSION_TOKEN"
                                }
                            }
                        }
                    ],
                    "docker_image": {
And that’s it. When the Docker script task initiates, temporary credentials will be provided as environment variables inside your Docker based on the policy that you input to Hybrik. If this task follows a long-running transcode job, the credentials won’t be created until the script task moves to “Active”.
Task Failures
Let’s say you have a Docker script task that does some custom detection/inspection of an input file. If the application returns a “fail” result, you may want the entire Hybrik job to stop at that point. Simply having your application inside of the Docker container exit with a status code greater than 0 will cause the Docker task to fail. Depending on your connections array, the pass/fail result could either trigger the next task in the job or trigger notifications.
Registries
For Hybrik to access your Docker image, you will need to upload it to (or it must already exist in) in an online container registry. The two registries that Hybrik currently supports are Dockerhub and Amazon’s Elastic Container Registry (known as ECR). Additionally, images can be hosted yourself.
Dockerhub
Here is what the docker_image portion of your job should look like if you wish to use a container from Dockerhub. It can be handy to set your Dockerhub username and password atop your job as Hybrik Definitions.
NOTE: Even when using a public image, a Dockerhub username and password are still required
"commands": [
    {
        "docker_image": {
            "image_urn": "username/imagename",
            "registry": {
                "kind": "dockerhub",
                "access": {
                    "username": "{{dockerhub_user}}",
                    "password": "{{dockerhub_password}}"
                }
            }
        },
        "args": ["your_binary", "--your", "args", "here"]
    }
]
AWS Elastic Container Registry (ECR)
Here is what the docker_image portion of your job should look like if using a container from AWS ECR as your registry. You will note that there is no username or password for accessing ECR containers. If the IAM user credentials used in the compute group have access to the ECR, no credentials need be specified, and the access is as in the json below.
"commands": [
    {
    "docker_image": {
        "image_urn": "AWS-ACCOUNT.dkr.ecr.REGION.amazonaws.com/<YOUR_IMAGE_HERE>:latest",
        "registry": {
            "kind": "ecr"
        }
    },
    "args": ["your_binary", "--your", "args", "here"]
}]
Additionally, you can provide a different set of AWS credentials (which can be stored in the Credentials Vault to access the image hosted on AWS ECR. This is needed if the compute group AWS credentials do not have access to the ECR. This done by adding an access object in the registry object, as shown below.
"commands": [
    {
    "docker_image": {
        "image_urn": "AWS-ACCOUNT.dkr.ecr.REGION.amazonaws.com/<YOUR_IMAGE_HERE>:latest",
        "registry": {
            "kind": "ecr",
            "access": {
                           "credentials_key": "ecr_access_credentials api_key from credentials vault"
            }
           }
        },
     "command_line": "{source_0_0} -o {output}"
    }
]
HTTP
If you don’t want to host your image in one of the other registries, you can utilize docker save and save your image as a tar.gz file. If you host this file somewhere publicly, Hybrik can use it for the Docker script task.
Note: the image_urn needs to be specified and needs to match the image name.
 "commands": [
    {
        "docker_image": {
            "image_urn": "image_name",
            "registry": {
                "storage_provider": "http",
                "url": "https://mydomain/image_name.tar.gz"
            }
        },
        "args": ["your_binary", "--your", "args", "here"]
S3 Storage
Just like an HTTP storage provider, you can utilize S3 if you don’t want to host your image in a registry but want to use AWS s3 to manage permissions.
Note: the image_urn needs to be specified and needs to match the image name.
 "commands": [
    {
        "docker_image": {
            "image_urn": "image_name",
            "registry": {
                "storage_provider": "s3",
                "url": "s3://your-bucket/path/to/image_name.tar.gz"
            }
        },
        "args": ["your_binary", "--your", "args", "here"]